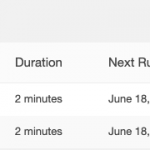
This section allows you to create/edit/delete/view and manage various Order Import/Export Schedules. Below is the snapshot of the list of Scheduled processes. Scroll down to learn more about this list and also how to create new schedules.
The table displayed above shows the following details:
Schedule Type
Shows the Type of Schedule – Import / Export
Profile Name
Shows the name of Profile
Duration
Shows the frequency/interval of the Schedule profile
Next Run
Shows the next run due Date & Time of the Schedule profile
Status
Shows the Status of Schedule – Enabled / Disabled
Action
Click on “Edit” or “Delete” to edit or delete the corresponding Schedule respectively
To create a new Schedule, click on the “Add New Schedule” button. Two types of Schedule Profiles can be created using this section – Import Schedule & Export Schedule.
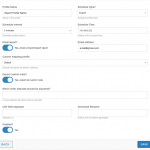
Below is a snapshot of the sub-section that shall appear to help you create new “ORDER EXPORT Schedule” when you select “Export” in the “Schedule Type?” Option.
Various options available in this section are:
Profile Name
Enter a suitable name for Schedule Profile.
Schedule Type?
Select “Export” in this case.
Schedule Interval
Select a desired interval from the given list.
Schedule Time
Enter the desired Time of Day. The Export process shall run at this time at the interval selected above.
Email Report?
Check this checkbox if you want a Report to be sent through e-mail on completion of this scheduling process.
Email address
Once you check the above checkbox, enter the e-mail address here where you would like to receive the Report.
Column mapping profile
This section allows you to select which columns you want to export. You can also select a mapping profile from this option if you have one. (Learn to create mapping profile in Field Mapping section)
Export custom meta?
Check this checkbox if you want to export the custom meta data columns of all orders in the export.
Which order statuses should be exported?
Select all the order statuses from this option that you want to export in the CSV file.
CSV field separator
This allows you to set the delimiter that will be used in the CSV exported. If no value entered then comma (,) will be used as the default delimiter.
Download filename
This is the name of the file which will be downloaded. The default name will be system generated.
Enabled?
Check this checkbox to enable the schedule profile.
Once all options are correctly checked and details entered press “Save”. Your Schedule profile shall be saved and appear in the list.
You can also click on the “Back” button to quit creating profiles and exit without saving.
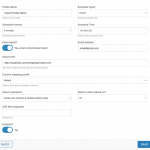
As mentioned earlier, you can create two types of schedule profiles, next is a snapshot of the sub-section that shall appear to help you create new “ORDER IMPORT Schedule” when you select “Import” in the “Schedule Type?” option.
Various options available in this section are:
Profile Name
Enter a suitable name for Schedule Profile.
Schedule Type?
Select “Import” in this case.
Schedule Interval
Select a desired interval from the given list.
Schedule Time
Enter the desired Time of Day. The process shall run at this time at the interval selected above.
Email Report?
Check this checkbox if you want a Report to be sent through e-mail on completion of this scheduling process.
Email address
Once you check the above checkbox, enter the e-mail address here where you would like to receive the Report.
Import URL
Enter the URL of the file to be imported.
Import Operation?
While importing/merging orders into your store you call select any of the following three strategies using this option:
- Create new order and update existing orders
- Create new order and skip existing orders (i.e. No Update)
- Skip new order and update existing orders (i.e. No Create, Only Update)
Search products based on?
With this option, you can choose the ‘field’ based on which searching/matching shall be done while updating the order. This search can be based on “ID”.
CSV field separator
This allows you to set the delimiter that will be used in the CSV imported. If no value entered then comma (,) will be used as the default delimiter.
Enabled?
Check this checkbox to enable the schedule profile.
Once all options are correctly checked and details entered press “Save”. Your Import Schedule profile shall be saved and appear in the list.
You can also click on the “Back” button to quit creating profiles and exit without saving.


